The Domain Name System (DNS) is a core network service that translates human-readable domain names (such as example.com) into IP addresses and back. On Windows Server, DNS plays a critical role in both internal networks and public infrastructure, enabling reliable name resolution for applications, services, and users.
A DNS server is a network service that provides and maintains the operation of DNS. The DNS server is an easy and light service that can run on most machines. If you don't intend to configure other roles and services on the target machine, the minimum configuration is enough.
How to set up a DNS server:
- Configuring the network adapter for the DNS server
- Installing the DNS Server Role
- Create a forward lookup zone
- Creating a reverse lookup zone
- Create an A record
- Describes the Domain Name System (DNS) features that are new or changed in Windows Server 2016.
Configuring the network adapter on the DNS server
Installing a DNS server requires a domain zone. You need to create a private network in your personal account and connect virtual machines to it.
After the machine is connected to both of the networks, it is important to remember which connection needs to be configured. Usually, a network adapter is setup by default from the very beginning with an access to the Internet. At the same time other additional network adapters have no Internet access until the configuration is performed manually:
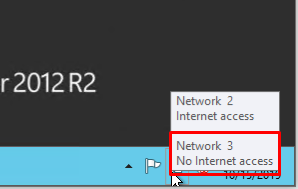
By hovering the cursor over the network icon in the system tray, you can find a tooltip with brief information about networks. Following the example above, you can see that the joined network is Network 3.
Perform a series of actions:
- Right-click Start and select Network Connections from the drop-down menu;
- Right-click on the required network adapter and select Properties from the menu;
- Select IPv4 In the Properties window, and click on the Properties button;
- Fill in the appropriate fields with the necessary data:

Here, the machine is assigned as the preferred DNS server, and the alternate is assigned as dns.google [8.8.8.8].
Installing the DNS server role
To add new roles to Windows Server, you use Add Roles and Features Wizard in Server Manager.
On the upper navigation bar of the Server Manager click the Manage menu, and then select Add Roles and Features:
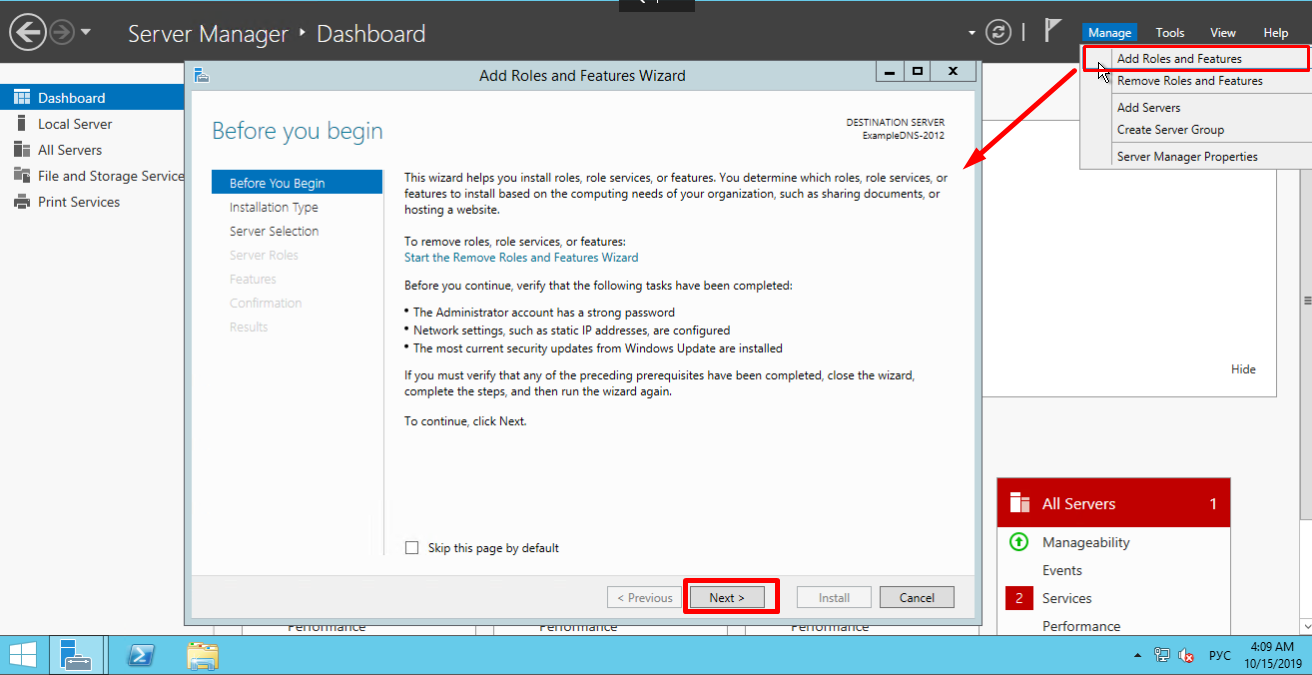
Here, the Wizard recommends you to verify if the following tasks have been completed:
1. The Administrator account has a strong password.
2. Network settings, such as static IP addresses, are configured.
3. The most current security updates from Windows Update are installed.
If you are sure that all the conditions are met, click Next;
Select the Role-based or feature-based installation and click Next:

Select a server you want from the server pool and click Next:
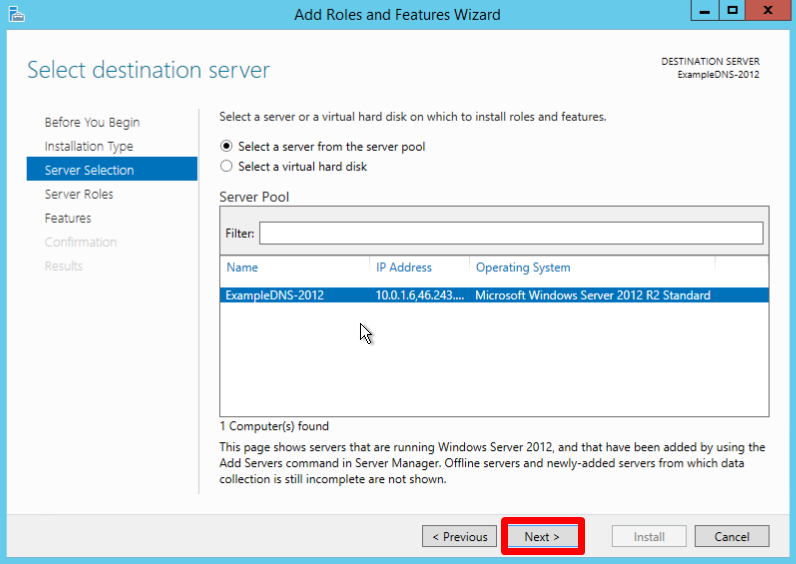
Check off the DNS server role and click Next:

Check the list of features to install and confirm by clicking Add Features:

Keep the list of features as is and click Next:

Read the information and click Next:

Check the installation configuration once again and confirm your decision by clicking Install:

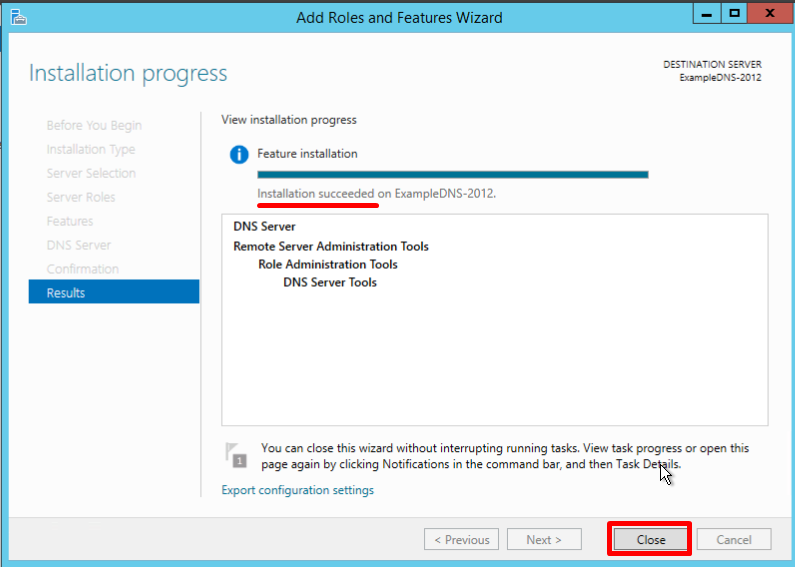
The final confirmation screen lets you know that the installation has been successfully completed, and you can close the installation Wizard:
Creating forward and reverse lookup zones
A DNS zone is a logical container for DNS records within a domain
Forward lookup zones resolve names to IP addresses.
Reverse lookup zones resolve IP addresses to names.
You have to use the DNS Manager to create and manage the zones.
On the upper navigation bar of the Server Manager click the Tools menu and select DNS in the drop-down list:

Creating a forward lookup zone
- Right-click on the Forward Lookup Zones folder, select New Zone. This will open the New Zone Wizard:
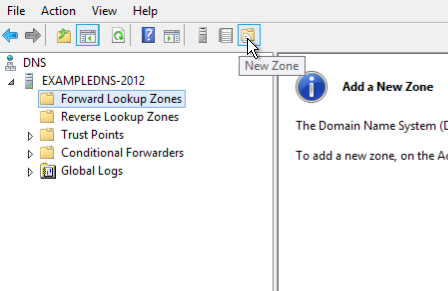
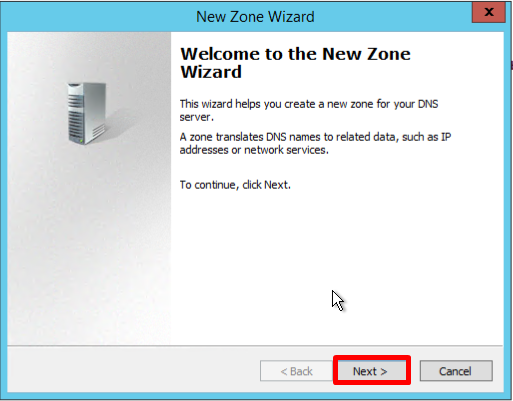
- On the Welcome screen of the Wizard, click Next:
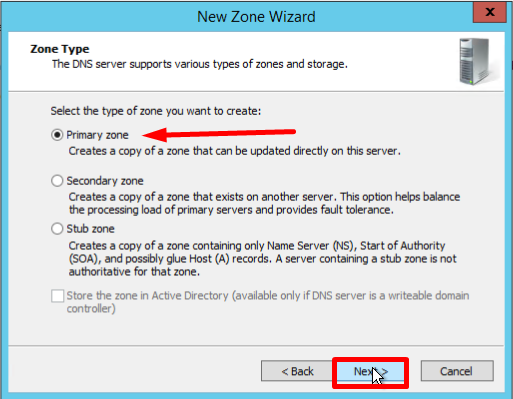
- On the Zone Type screen, Select Primary Zone, and click Next:
- Enter the name, and click Next:

- If necessary, change the name of the future zone file and click Next:

- You must choose whether you want to allow dynamic updates or not. It is not recommended to allow this because of a significant vulnerability. Click Next:

- Verify that the selected settings are correct, click Finish:
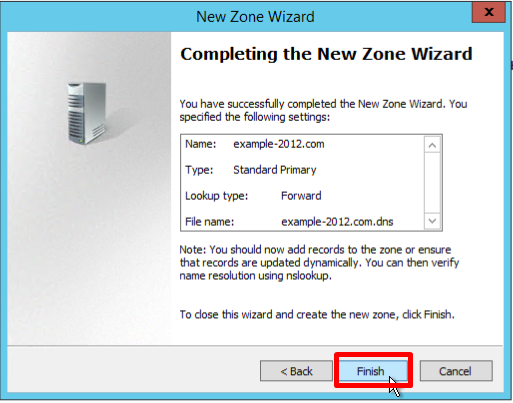
Creating a reverse lookup zone
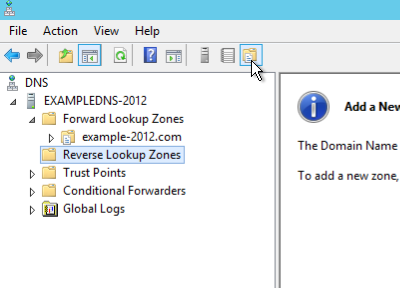
- Open the DNS Manager and right-click on the Reverse Lookup Zones folder, select New Zone. This will open the New Zone Wizard:
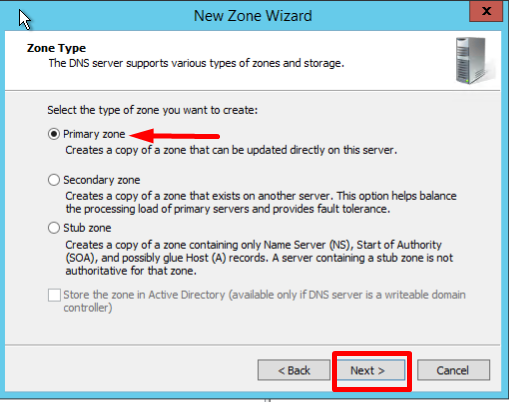
- On the Zone Type screen, Select Primary Zone, and click Next:
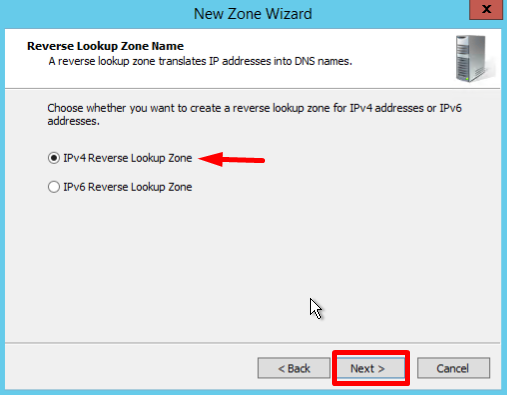
- In the first Reverse Lookup Zone Name page, select IPv4, click Next:
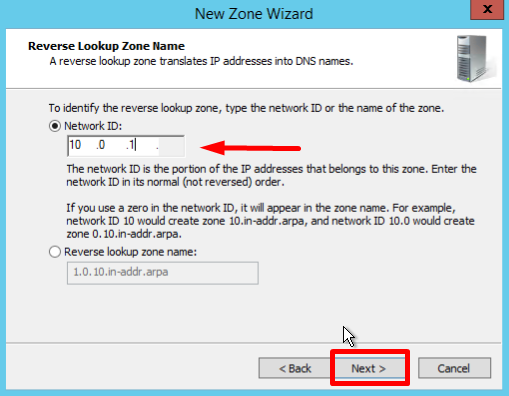
- Type the network ID (the first three octets of the IP address) and click Next:
- If necessary, change the name of the future zone file and click Next:
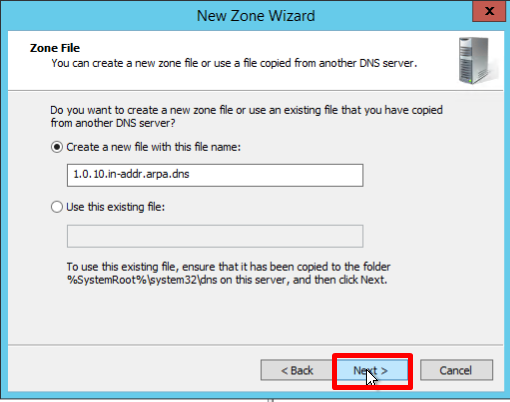
- You must choose whether you want to allow dynamic updates or not. It is not recommended to allow this because of a significant vulnerability. Click Next:

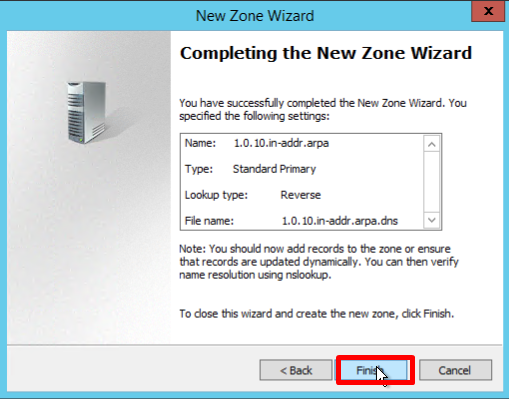
- Verify that the selected settings are correct, click Finish:
Creating a host (A) record
This section of the guideline is here to mostly check all the steps you performed earlier.
A Resource Record is the unit of information storage and transmission in DNS. RRs are the basic building blocks of host-name and IP information and are used to resolve all DNS queries.
Record A — a record that lets you map hostnames to an IP address of the host.
Record PTR — is the reverse version of an A Record.
- Open the Forward Lookup Zones folder in the DNS Manager and find the zone folder. Right-click on the right part of the DNS Manager and select New Host (a or AAA):

- New Host page opens. In Name, type a name of the host (with no domain, it will use the name of the Zone as a domain) and your IP address. Check off the section "Create associated pointer (PTR) record", to verify if both Forward and Reverse Lookup Zones are operating properly:
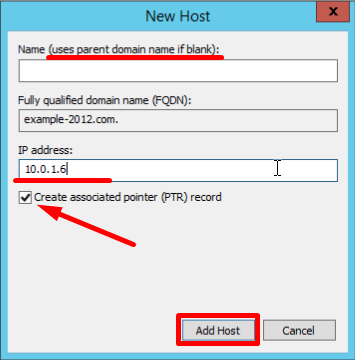
If the Name field is blank it uses parent domain name.
- You can also add records for other servers:
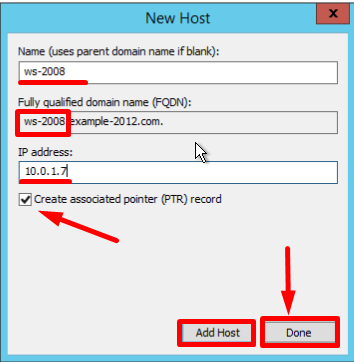
- Once you are finished, click Done.
Making sure everything is correct
- Check the changes in the folders of the zones (in the example below you can see 2 records appeared in each of them):


- Open the command line (cmd) or PowerShell and run the nslookup command:
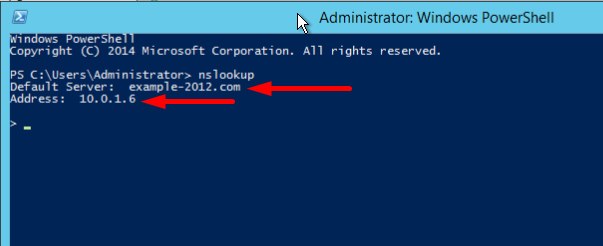
It shows that the default DNS server is example-2012.com with the address 10.0.1.6.
To make sure that the Forward and Reverse Zones are operating properly, you can send two queries:
- To query the domain;
- To query the IP address:
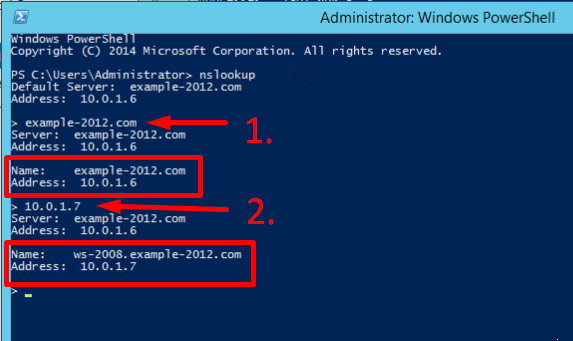
In the example, we have got appropriate responses for both queries.
- There is an option to send a query to an external resource:
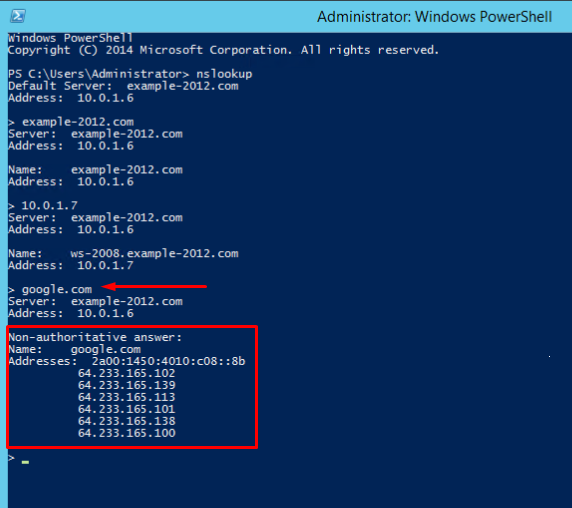
We see a new line here "Non-authoritative answer". This means that our DNS server does not contain domain’s original zone files. Although the information displayed below, received from an authoritative server, it is not itself authoritative in this case.
To compare, all the same queries were made on the server where the forward and reverse zones were not configured:

Here, the machine assigned itself as a default DNS server. The DNS server domain name is displayed as unknown because there are no resource records for the IP address (10.0.1.7). For the same reason, the 2nd query returns an error (Non-existent domain).
Describtion of the Domain Name System (DNS) features which are new or changed in Windows Server 2016.
In Windows Server 2016, DNS Server offers updates in the following areas:
- DNS Server Policies
- Response Rate Limit (RRL)
- DNS Based Named Entity Authentication (DANE)
- Unknown record support
- IPv6 root hints
- Windows PowerShell Support
DNS Server Policies
Now you can use these features:
- DNS Policy for Geo-Location based traffic management
- Intelligent DNS responses based on the time of day, to manage a single DNS server configured for split-brain deployment
- Apply filters on DNS queries, and more.
Specific description of these features:
Application Load Balancing
When you have deployed multiple instances of an application at different locations, you can use DNS policy to balance the traffic load between the different application instances, dynamically allocating the traffic load for the application.
Geo-Location Based Traffic Management.
You can use DNS Policy to allow primary and secondary DNS servers to respond to DNS client queries based on the geographical location of both the client and the resource to which the client is attempting to connect, providing the client with the IP address of the closest resource.
Split Brain DNS
With split-brain DNS, DNS records are split into different Zone Scopes on the same DNS server, and DNS clients receive a response based on whether the clients are internal or external clients. You can configure split-brain DNS for Active Directory integrated zones or for zones on standalone DNS servers.
Filtering
You can configure DNS policy to create query filters that are based on criteria that you supply. Query filters in DNS policy allow you to configure the DNS server to respond in a custom manner based on the DNS query and DNS client that sends the DNS query.
Forensics
You can use DNS policy to redirect malicious DNS clients to a non-existent IP address instead of directing them to the computer they are trying to reach.
Time of day based redirection
You can use DNS policy to distribute application traffic across different geographically distributed instances of an application by using DNS policies that are based on the time of day.
You can also use DNS policies for Active Directory integrated DNS zones.
Response Rate Limiting (RRL)
ТYou can configure RRL settings to control how to respond to requests to a DNS client when your server receives several requests targeting the same client.
By doing this, you can prevent someone from sending a Denial of Service (Dos) attack using your DNS servers.
For instance, a bot net can send requests to your DNS server using the IP address of a third computer as the requestor. Without RRL, your DNS servers might respond to all the requests, flooding the third computer.
When you use RRL, you can configure the following settings:
Responses per second This is the maximum number of times the same response is given to a client within one second.
Errors per second This is the maximum number of times an error response is sent to the same client within one second.
Window This is the number of seconds for which responses to a client are suspended if too many requests are made.
Leak rate This is how frequently the DNS server responds to a query during the time responses are suspended. For instance, if the server suspends responses to a client for 10 seconds, and the leak rate is 5, the server still responds to one query for every 5 queries sent. This allows the legitimate clients to get responses even when the DNS server is applying response rate limiting on their subnet or FQDN.
TC rate This is used to tell the client to try connecting with TCP when responses to the client are suspended. For instance, if the TC rate is 3, and the server suspends responses to a given client, the server issues a request for TCP connection for every 3 queries received. Make sure the value for TC rate is lower than the leak rate, to give the client the option to connect via TCP before leaking responses.
Maximum responses This is the maximum number of responses the server issues to a client while responses are suspended.
Allowlist domains This is a list of domains to be excluded from RRL settings.
Allowlist subnets This is a list of subnets to be excluded from RRL settings.
Allowlist server interfaces This is a list of DNS server interfaces to be excluded from RRL settings.
DNS Based Named Entity Authentication (DANE)
You can use DANE support (RFC 6394 and 6698) to specify to your DNS clients what CA they should expect certificates to be issued from for domains names hosted in your DNS server. This prevents a form of man-in-the-middle attack where someone is able to corrupt a DNS cache and point a DNS name to their own IP address.
Unknown record support
An "Unknown Record" is an RR whose RDATA format is not known to the DNS server. The newly added support for unknown record (RFC 3597) types means that you can add the unsupported record types into the Windows DNS server zones in the binary on-wire format. The Windows caching resolver already has the ability to process unknown record types. Windows DNS server does not do any record specific processing for the unknown records, but sends it back in responses if queries are received for it.
IPv6 root hints
The IPV6 root hints, as published by IANA, have been added to the Windows DNS server. The internet name queries can now use IPv6 root servers for performing name resolutions.
Windows PowerShell support
The following new Windows PowerShell cmdlets and parameters are introduced in Windows Server 2016.
Add-DnsServerRecursionScope - This cmdlet creates a new recursion scope on the DNS server. Recursion scopes are used by DNS policies to specify a list of forwarders to be used in a DNS query.
Remove-DnsServerRecursionScope - This cmdlet removes existing recursion scopes.
Set-DnsServerRecursionScope - This cmdlet changes the settings of an existing recursion scope.
Get-DnsServerRecursionScope - This cmdlet retrieves information about existing recursion scopes.
Add-DnsServerClientSubnet - This cmdlet creates a new DNS client subnet. Subnets are used by DNS policies to identify where a DNS client is located.
Remove-DnsServerClientSubnet - This cmdlet removes existing DNS client subnets.
Set-DnsServerClientSubnet - This cmdlet changes the settings of an existing DNS client subnet.
Get-DnsServerClientSubnet - This cmdlet retrieves information about existing DNS client subnets.
Add-DnsServerQueryResolutionPolicy - This cmdlet creates a new DNS query resolution policy. DNS query resolution policies are used to specify how, or if, a query is responded to, based on different criteria.
Remove-DnsServerQueryResolutionPolicy - This cmdlet removes existing DNS policies.
Set-DnsServerQueryResolutionPolicy - This cmdlet changes the settings of an existing DNS policy.
Get-DnsServerQueryResolutionPolicy - This cmdlet retrieves information about existing DNS policies.
Enable-DnsServerPolicy - This cmdlet enables existing DNS policies.
Disable-DnsServerPolicy - This cmdlet disables existing DNS policies.
Add-DnsServerZoneTransferPolicy - This cmdlet creates a new DNS server zone transfer policy. DNS zone transfer policies specify whether to deny or ignore a zone transfer based on different criteria.
Remove-DnsServerZoneTransferPolicy - This cmdlet removes existing DNS server zone transfer policies.
Set-DnsServerZoneTransferPolicy - This cmdlet changes settings of an existing DNS server zone transfer policy.
Get-DnsServerResponseRateLimiting< - This cmdlet retrieves RRL settings.
Set-DnsServerResponseRateLimiting - This cmdlet changes RRL settigns.
Add-DnsServerResponseRateLimitingExceptionlist - This cmdlet creates an RRL exception list on the DNS server.
Get-DnsServerResponseRateLimitingExceptionlist- This cmdlet retrieves RRL excception lists.
Remove-DnsServerResponseRateLimitingExceptionlist - This cmdlet removes an existing RRL exception list.
Set-DnsServerResponseRateLimitingExceptionlist - This cmdlet changes RRL exception lists.
Add-DnsServerResourceRecord - This cmdlet was updated to support unknown record type.
Get-DnsServerResourceRecord - This cmdlet was updated to support unknown record type.
Remove-DnsServerResourceRecord - This cmdlet was updated to support unknown record type.
Set-DnsServerResourceRecord- This cmdlet was updated to support unknown record type
For more information, see the following Windows Server 2016 Windows PowerShell command reference topics.
Powershell DNS Server
Powershell DNS Client
Conclusion
Configuring a DNS server on Windows Server 2012–2022 is a foundational step for building a reliable and secure network infrastructure. Properly configured forward and reverse lookup zones, along with accurate A and PTR records, ensure consistent and efficient name resolution. New DNS features introduced in Windows Server 2016 and later further enhance security, scalability, and traffic control for modern network environments.
FAQ: Windows DNS Server Configuration
- Q1: What is the difference between a forward and reverse lookup zone?
A: A forward lookup zone translates domain names into IP addresses, while a reverse lookup zone translates IP addresses into domain names. - Q2: Can I use Windows Server DNS in a small network without Active Directory?
A: Yes, you can install and configure the DNS role on a standalone server without AD, although AD integration provides additional features like dynamic updates. - Q3: Why should I avoid enabling dynamic updates in DNS zones?
A: Dynamic updates can introduce security risks, such as unauthorized changes or spoofed records. It’s recommended to leave them disabled unless you’ve implemented secure dynamic updates. - Q4: What is Response Rate Limiting (RRL) and why is it important?
A: RRL helps protect your DNS server from being used in amplification attacks by limiting the number of identical responses sent to a single client in a short time. - Q5: How can I test my DNS server configuration?
A: Use the nslookup or dig command to test name resolution for both forward and reverse lookups. Verify responses match expected IP addresses or hostnames. - Q6: What are DNS Server Policies used for in Windows Server 2016+?
A: DNS Policies allow administrators to control how the DNS server responds to queries based on client location, time of day, or query type — enabling geo-load balancing, split-brain DNS, filtering, and more. - Q7: Does Windows DNS Server support IPv6?
A: Yes. Windows DNS Server includes IPv6 root hints and fully supports IPv6 record types, making it ready for dual-stack or IPv6-only networks.


