OpenVPN is an open implementation of one of the VPN technologies, designed to organize secure virtual private networks between geographically remote local networks, as well as individual clients. Tunnel security is provided by encryption using OpenSSL.
How does OpenVPN work?
Upon completion of the server setup and its launch, it will enter the standby mode of receiving and redirecting external secure SSL connections to the virtual network adapter (tun/tap).
Optionally, server routing can be configured so that client Internet traffic passes through the server and becomes server traffic. In this case, OpenVPN will perform proxy traffic.
What is required from the operating system?
Before installing OpenVPN, you need to make sure that the basic parameters are correct.
- The server has at least one “white” static IP address. Those. The server must be accessible from the Internet. If the address is dynamic, but the server remains accessible from the global network, use the DynDNS services.
- Allowed to download and install packages from official repositories. To check, run cat /tc/apt/sources.list. Lines with instructions from the repositories should be uncommented (there should be no “#" sign at the beginning of the line).
![Screenshot 1: Configuring OpenVPN on Ubuntu - requirements of OS]()
- The network parameters must be correctly specified - hostname, parameters of DNS servers.
Getting to the installation.
All installation steps will be performed by the root user.
- Updating repository information:
apt-get update- Install the current system updates and installed programs:
apt-get upgrade- Install OpenVPN:
apt-get install openvpn
Important. In basic repositories, the latest version of a package is often missing. OpenVPN developers maintain their repository, how to configure it can be found on the official website of the.
- Install the easy-rsa package in the same way:
apt-get install easy-rsaPost-installation steps
We place easy-rsa scripts:
cd /etc/openvpn/ && make-cadir easy-rsaWe prepare public keys (PKI - Public Key Infrastructure):
- Go to the / etc / openvpn / easy-rsa directory:
cd /etc/openvpn/easy-rsa- Creating a symbolic link to the openssl configuration file:
ln -s openssl-1.0.0.cnf openssl.cnf- We initialize the vars script:
source ./varsThe system will report: NOTE: If you run ./clean-all, I will be doing a rm -rf on / etc / openvpn / easy-rsa / keys
- We carry out ./clean-all
![Screenshot 3: Configuring OpenVPN on Ubuntu - ./clean-all]()
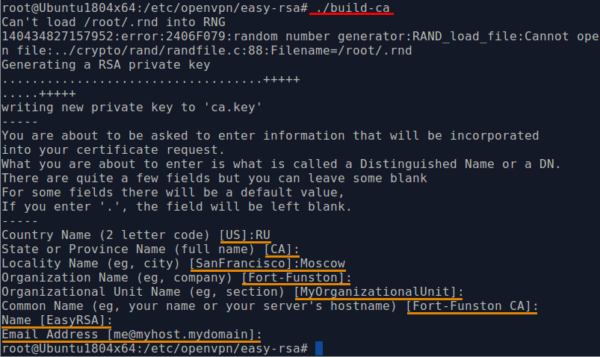
- To create a certification authority, run the script:
./build-caIn the course of its work, the program will ask several questions. They should be answered in Latin letters. If you do not fill in any field, the program will substitute default values, usually indicated in parentheses.

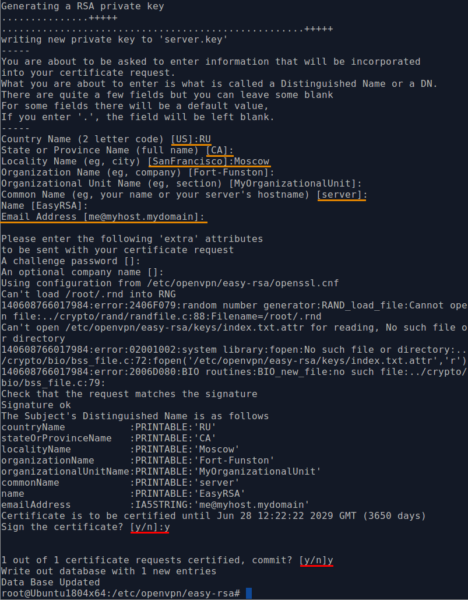
Create the server key
To create the server key, execute the command:
./build-key-server server
It should be noted that the process is similar to generating a certificate of a certification authority, however, before signing the certificate, the program will ask 2 clarifying questions. If everything is correct, answer “y”.
Generation of client keys
Similarly to generating server keys, client keys are also created:
./build-key client1It should be noted that the created client1.key does not have a password or cryptographic protection. This can lead to the fact that any user who has taken possession of the file can try to connect to the server. If such a threat exists, it is better to generate keys with another script:
./build-key-pass client2The script will ask for a passphrase at the very beginning. Further, the process is no different from generating server keys and a simple client.

Keep in mind that key names must be unique. One user - one key with a unique name.
It happens that in the course of the server’s operation, after some time, it is necessary to create one or more certificates. To do this, you will need to reinitialize the vars script and only then start the key generation process:
cd /etc/openvpn/easy-rsasource ./vars./build-key client3Diffie-Hellman key generation
Thanks to the Diffie-Hellman protocol, two or more parties can receive one secret key, which will allow building a secure communication channel. The keys are generated by the command:
./build-dhThe result will be something like this.

When the program is finished, the dh2048.pem file will appear in the /etc/openvpn/easy-rsa/keys/ directory
Moving certificates and keys
Server
Keys and certificates created. It is time to distribute them to users, and copy server keys to the appropriate directories on the server.
- Go to the directory with the keys:
cd /etc/openvpn/easy-rsa/keys- We copy only the files necessary for the server:
cp ca.crt ca.key dh2048.pem server.crt server.key /etc/openvpnIt is important to understand that the above files are the basis of the operation and security of the VPN server. Loss or substitution of these files can have extremely negative consequences. It is important to store them in a safe place and not transmit them over open communication channels.
Clients
The client will need only 3 files ca.crt, client1.crt, client1.key. Each client needs to give only his keys. These files can be placed in the / etc / openvpn directory on the client machine if it is running a Linux-like OS.
On Windows, they should be placed in the user directory.
Server and client setup
Server
Most installed programs on Linux have so-called sample files. These files contain configuration examples and explanations of them. OpenVPN was no exception. Unpack the server configuration file into the / etc / openvpn directory:
gunzip -c /usr/share/doc/openvpn/examples/sample-config-files/server.conf.gz > /etc/openvpn/server.confThe server is ready to work with the received file. It is configured with the possibility of tunneling, but cannot proxy, i.e. sending client traffic on its behalf. Fix this.
First, check which files are in the / etc / openvpn directory:
ls /etc/openvpn
Open the configuration file:
nano /etc/openvpn/server.confAnd we check the compliance of the files prescribed in the configuration with the files in the directory. Interesting lines after " SSL/TLS root certificate (ca), certificate (cert), and private key (key).”

If the names differ from the existing ones, the necessary corrections should be made. Exit the editor by pressing Ctrl + X.
We start the server:
/etc/init.d/openvpn startCheck the launch result:
/etc/init.d/openvpn status
Client settings.
It is assumed that the OpenVPN package is already installed on the client side.
- Copy the client settings file to the user's home directory:
cp /usr/share/doc/openvpn/examples/sample-config-files/client.conf /root- Copy the generated keys - client1.key, client1.crt, ca.crt:
cd /etc/openvpn/easy-rsa/keyscp client1.key client1.crt ca.crt /root- Editing the client configuration file:
nano /root/client.conf- We find the commented out lines “# The hostname / IP and port of the server”. For the remote parameter, change my-server-1 to the IP address of the server or its domain name.
![Screenshot 13: Configuring OpenVPN on Ubuntu - client settings]()
- In the same file, below, we find the block “# SSL / TLS parms.”. Editing key names.
![Screenshot 14: Configuring OpenVPN on Ubuntu - edit key names]()
- We exit editing with the combination Ctrl + X. We answer “Y” to the question of saving changes. The file name is left unchanged.
- Transfer the files client1.key, client1.crt, ca.crt and client.conf to the client computer from which the connection to the OpenVPN server will take place.
Important! Some client implementations of OpenVPN only work with * .ovpn files. In such cases, it is enough to change the file extension (rename) from client.conf to client.ovpn.
- We connect to the server with the command:
openvpn openvpn.confIt should be noted that proxying is still not configured. At the same time, when the client machine is connected to the OpenVPN server, Internet access is terminated. This is because the created TUN adapter, and in the place with it the server itself, is the default gateway.
Configuring routing.
- On the server, edit the server.conf file:
nano /etc/openvpn/server.conf- We find the following line in the file and delete the “;” symbol in front of it, thus uncommenting it:
push "redirect-gateway def1 bypass-dhcp"- Save and close the editor.
- Editing the file /etc/sysctl:
nano /etc/sysctl.conf- At the end of the file, add the following line:
net.ipv4.ip_forward=1This will allow the system to forward traffic between interfaces, but the changes will only take effect after a reboot. Save the file and close the editor.
- Allow forwarding packages without rebooting the server:
echo 1 > /proc/sys/net/ipv4/ip_forward- Configure NAT in iptables. We enter the commands one by one:
iptables -A FORWARD -m state --state RELATED,ESTABLISHED -j ACCEPTiptables -A FORWARD -s 10.8.0.0/24 -j ACCEPTiptables -A FORWARD -j REJECTiptables -t nat -A POSTROUTING -s 10.8.0.0/24 -o eth0 -j MASQUERADEiptables -A INPUT -i tun+ -j ACCEPTiptables -A FORWARD -i tun+ -j ACCEPTiptables -A INPUT -i tap+ -j ACCEPTiptables -A FORWARD -i tap+ -j ACCEPTYou can also simply enter them into the /etc/rc.local file up to the line “exit 0” or configure the firewall.
The server is ready to use. However, the task is to proxy all traffic, and therefore it is necessary to configure forwarding of DNS queries. Customize.
- Install dnsmasq
If the installation is performed on an Ubuntu OS:
apt-get install dnsmasqEven though in most modern versions of the Ubuntu OS, dnsmasq is already preinstalled, in older versions you must do this:
apt-get install dnsmasq && dpkg-reconfigure resolvconfThe installation wizard dialogue box may start. There will be 2 questions in it. In the first case, the question “prepare /etc/resolv.conf for dynamic updates” is answered with “Yes”, and in the next, “Append original file to dynamic file?” answer “No”.
For Debian 7 OS:
apt-get install dnsmasq resolvconf- Edit the dnsmasq settings file:
nano /etc/dnsmasq.confAdd the following parameters:
listen-address=10.8.0.1bind-interfacesSave the file and close the editor.
- Editing the network settings file:
nano /etc/network/interfacesIt is required to specify the address of DNS servers in the corresponding sections of the adapter settings:
dns-nameservers 8.8.8.8 8.8.4.4Perhaps this action has already been performed. You do not need to perform it again.
- Considering the peculiarity of dnsmasq startup and subsequent operation - the possibility of crashing before initializing the virtual tun adapter, add the following line to the rc.local file, before “exit 0”:
/etc/init.d/dnsmasq restart- Now let the OpenVPN server clients use DNS. Using the nano editor, uncomment the line:
push "dhcp-option DNS 10.8.0.1"We fix the changes in the file.
- Reboot the server:
reboot


