For native interaction with Windows and Linux, WSL was developed. Where WSL translates Linux system calls into similar Windows calls, allowing applications created for Linux to function in the Windows environment. However, there is an important difference between WSL 1 and WSL 2:
WSL 1 is an emulation of system calls. It creates a Linux user space, where Linux system calls are translated into Windows API calls.
Example: if a Linux program calls fork() or open(), WSL 1 transforms this into the corresponding Windows calls, such as CreateProcess or CreateFile.
- Pros: fast access to the Windows file system.
- Cons: not all system calls are supported (for example, Docker).
WSL 2 is a full-fledged Linux kernel. It uses a virtual machine based on Hyper-V. Inside, a real Linux kernel from Microsoft is launched.
System calls are not translated: everything is done natively, as on a regular Linux machine.
- Pros: maximum compatibility - Docker, systemd, iptables and other tools work without problems.
- Cons: slightly slower access to the Windows file system (/mnt/c/...).

How to install WSL on Windows?
Windows Subsystem for Linux (WSL) is a tool that allows you to run Linux distributions directly on Windows without using virtual machines. WSL is useful for developers and system administrators who want to work in a Linux environment without leaving Windows.
In this guide, we'll cover installing WSL on Windows 10 and Windows 11.
Step 1. Checking your Windows version
Before starting the installation, make sure your Windows version supports WSL:
- Windows 10 version 2004 and above (with the 2020 update installed)
- Windows 11 — WSL support is built in by default
Check your system version:
winver 
If the version is lower than 2004, update Windows via the update center.
Step 2. Installing WSL via PowerShell
Microsoft has simplified the installation of WSL — now you only need one command:
Run PowerShell as administrator. Run the following command:
wsl --install The command will automatically:
- Enable the necessary Windows components
- Install the latest version of WSL (WSL 2)
- Download and install Ubuntu by default
- After the installation is complete, a system reboot will be required.
Step 3. Install another Linux distribution (optional)
If you want to install another distribution (e.g. Debian, openSUSE, Kali, etc.), run the command:
wsl --list --online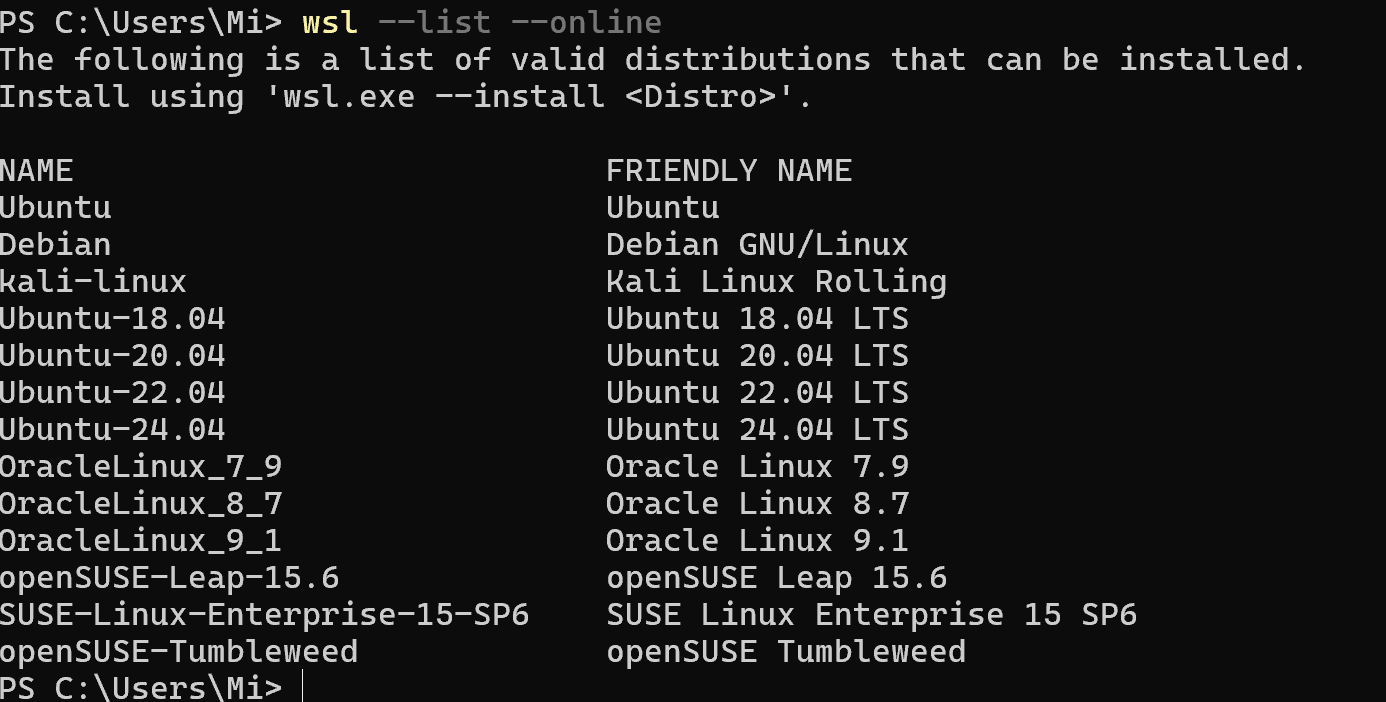
Select the desired distribution from the list and install it:
wsl --install -d <distribution_name> Example:
wsl --install -d Debian 
Step 4. Checking the installed WSL version
To find out which version of WSL is used (WSL 1 or WSL 2):
wsl --list --verbose If you need to change the version for a specific distribution:
wsl --set-version <distribution_name> 2 Example:
wsl --set-version Ubuntu 2 Step 5. Update the WSL kernel (if necessary)
If an error related to the kernel occurred during installation, download the update from the official Microsoft website:
Install the downloaded .msi file, then repeat the installation of WSL. It provides a convenient environment for developing and working with Linux tools directly in Windows. With WSL, you can run Docker, use package managers (apt, yum), work with git, and execute Bash scripts.
FAQ - Installing and Using WSL on Windows
- 1. What is the difference between WSL 1 and WSL 2?
WSL 1 translates Linux system calls into Windows API calls, making it faster when accessing Windows files but less compatible with some Linux tools. WSL 2 runs a real Linux kernel in a lightweight virtual machine, providing full compatibility with Docker, systemd, and other utilities. - 2. Which version of WSL should I choose?
For most developers, WSL 2 is recommended — it offers better performance, full Linux compatibility, and support for containerization tools. Choose WSL 1 only if you need faster file system access or lack virtualization support on your device. - 3. Can I run graphical Linux applications in WSL?
Yes. On Windows 11, WSL natively supports Linux GUI applications. On Windows 10, you can use third-party X servers (like VcXsrv) to display Linux GUIs. - 4. How do I update or switch between WSL versions?
You can list installed distributions with:wsl --list --verbose
Then switch a specific one to WSL 2 using:
wsl --set-version <distribution_name> 2 - 5. Does WSL work with Docker and systemd?
Yes. WSL 2 supports Docker, systemd, iptables, and other low-level Linux tools. WSL 1 does not fully support these features. - 6. Is WSL safe to use for development?
Absolutely. WSL is officially supported by Microsoft and isolates Linux environments from Windows, providing a secure and efficient way to work with open-source tools on Windows systems.


