Introduction
In this guide, I’ll walk you through the process of deploying a Laravel application on a server running Ubuntu 20.04.
We’ll cover the full setup using NGINX, PHP, and MySQL, along with configuring file permissions, environment variables, and optimizing the server for better performance and stability.
Laravel — is a publicly available PHP framework and was developed back in 2011. It is used to create multi-tiered Web resources and applications.
It promptly supports functional testing when creating software, and you can avoid using other software testing tools. Easy scalability of projects on Laravel framework.
The framework provides a simple but fast and accessible authorization system and gives you immediate access rights to your files. This allows us to restrict access to unauthorized users. Providing application security, the framework code is protected from threats such as SQL injection or cross-site query spoofing.
Laravel provides a simple and flexible approach to web application development. It comes with powerful features and tools that allow developers to create and maintain web applications quickly and easily. There is also an option for advanced developers to use templates and modules to design and develop applications more efficiently. In addition, Laravel supports many popular databases such as MySQL, Postgres, SQLite, and MS SQL, making it more suitable for developing applications with different databases. It has built-in mechanisms for security and authentication, and on top of that, it has powerful tools for monitoring applications. All this makes Laravel very attractive for web application development.
Nginx supports the following unique features:
- Performance management: Nginx provides many tools to tune server performance, including the ability to scale and load control.
- Large number of protocols support: Nginx supports wide range of protocols including HTTP, HTTPS, FTP, SMTP, and many more.
- Caching management: Nginx allows caching tuning to improve performance and response time.
- Support for distributed applications: Nginx supports distributed applications, allowing it to distribute the load across multiple servers.
- Support for shared hosting: Nginx allows you to do shared hosting, allowing multiple web sites to run on a single server.
System requirements
- Server on a Linux Ubuntu operating system;
- Updated system and application packages;
- Pre-installed software of: database; webserver.
System changes
Updating packages.
sudo apt updateInstall the required packages of PHP modules.
sudo apt install php-mbstring php-xml php-bcmath![]()
DB creation
First of all, lets research some unique options at mysql database.
- Optimization strategies: using indexes, query optimization and configuration settings.
- Master-slave replication, which allows asynchronously duplicating data between multiple servers.
- Binary logs for logging changes in database tables.
- Procedural SQL (PL/SQL) queries to perform complex tasks.
- Use of triggers for automatic execution of actions after query execution.
- Support for views that provide another mechanism for storing and manipulating data.
- Support for stored procedures for complex tasks.
- Support for deferred tasks to perform queries and actions at a specific time.
- Using clustering to distribute data and queries between nodes.
- Support for working with geodata that allows using data on maps.
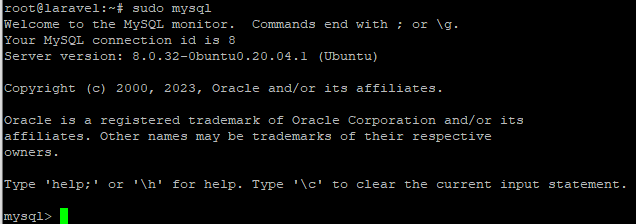
sudo mysql
Created a new "database".

Created a user and gave me all the rights for the created "DB".

Granted all access for the "DB" to the user, then left the "DB".

This gives the user all the rights to access the "database" for administration.
Check whether we can enter MySQL using the credentials of our user.

Check the same access to the created "DB", then exit the "DB".

Creating a new application
I create a table in the DB.

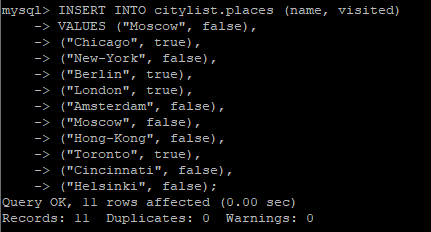
Entering data into the table. In my case, I enter data on popular cities.

Check whether records have been added to the table. You will see a window like this.

Developing an app for the framework
Once you have created a citylist application. This is used to show the main configurations of the framework and access to the "database".
I have created a new directory called "citylist" where the framework itself will be contained.
composer create-project --prefer-dist laravel/laravel "name_of_your_project"After installation, the following information will be shown on the command line.

Now open the directory of our application and run the artisan command to check if the components are installed correctly.
cd "name_of_your_project"

php artisan
Artisan is the CLI included in the framework. It gives you a number of commands that are useful for developing your application.
If everything is done as instructed, the following will be shown.

Configuring the framework
The framework's configuration is located in the "config" directory of your main directory. When we installed the framework using the "Composer" utility, we created an environment file.
The environment file records the settings of your environment, where the application resides, and puts its file above the other settings files, which are located in the "config" directory.
Open the ".env" file.
Nano .envAlthough the file seems to have a lot of configurations, but I will configure only the ones we need. Below I will write and describe which parameters I will change.
- NAME is the name of the application.
- ENV is an environment variable defining the current environment of the application.
- KEY is the application key used to encrypt data.
- URL is the URL of the application.
- DATABASE is the name of the database.
- USERNAME is the user name of the database.
- PASSWORD is the database user password.
Change the following keys in the application file.

Setting up a web server
Move our application folder to "/var/www" directory, which is usually where all applications that run on a web server are stored.
mv ~/name_of_your_project /var/www/name_of_your_project![]()
Gave access to the folders where the framework saves the files created by the application.

Let's proceed with setting up the web server. Create a virtual host configuration file.
nano /etc/nginx/sites-available/name_of_your_projectInsert the following settings for the web server.
server {

listen 80;

server_name IP ADDRESS/DOMAIN_NAME;

root /var/www/YOURPROJECT/public;

add_header X-Frame-Options "SAMEORIGIN";

add_header X-XSS-Protection "1; mode=block";

add_header X-Content-Type-Options "nosniff";

index index.html index.htm index.php;

charset utf-8;

location / {

try_files $uri $uri/ /index.php?$query_string;}

location = /favicon.ico { access_log off; log_not_found off; }

location = /robots.txt { access_log off; log_not_found off; }

error_page 404 /index.php;

location ~ \.php$ {

fastcgi_pass unix:/var/run/php/php7.4-fpm.sock;

fastcgi_index index.php;

fastcgi_param SCRIPT_FILENAME $realpath_root$fastcgi_script_name;

include fastcgi_params;

}

location ~ /\.(?!well-known).* {

deny all;}}

Now, run a new file with virtual host settings, create a link to your project in "sites-enabled".
sudo ln -s /etc/nginx/sites-available/name_of_your_project /etc/nginx/sites-enabled/Check for error syntax in the settings.
sudo nginx -tReboot web-server
systemctl reload nginxConfiguring main framework page
Open the main route file.
nano routes/web.phpEnter the following parameters into our file.

Create a new file - a screen that will render the output from the "DB" for the user.
nano resources/views/travellist.blade.php
This code is designed to output the information. We write it in the configuration file.
<?php

use Illuminate\Support\Facades\DB;

Route::get('/', function () {

$visited = DB::select('select * from places where visited = ?', [1]);

$togo = DB::select('select * from places where visited = ?', [0]);

return view('yourproject', ['visited' => $visited, 'togo' => $togo ] );});
Save the file. Open the browser and reload the application. The page itself will look in this format.

Output
In this publication we have analyzed the following actions:
- Created and painted the "DB" for the application.
- Configured the new framework application.
- configured the framework and web server
- Configured the main page of the framework.
Conclusion
Deploying a Laravel application on NGINX using Ubuntu 20.04 involves several critical steps: setting up the server environment, configuring PHP and MySQL, creating and configuring the Laravel application, setting permissions, and optimizing the web server for performance and security. By following this step-by-step guide, you can ensure your Laravel application is stable, secure, and ready for production. Proper configuration of the .env file, database access, and virtual host settings guarantees smooth operation, while NGINX optimizations enhance speed and reliability. This approach allows developers to deploy scalable and maintainable web applications efficiently.
FAQ
- Q1: What are the main requirements to deploy Laravel on NGINX?
A: You need a Linux Ubuntu 20.04 server with updated packages, PHP with required modules (e.g., mbstring, xml, bcmath), MySQL or another supported database, and NGINX installed. - Q2: How do I configure database access for Laravel?
A: Create a new database and user in MySQL, grant the user full permissions, and update the .env file in Laravel with the database name, username, and password. - Q3: How do I set up NGINX for Laravel?
A: Create a virtual host file in /etc/nginx/sites-available/, set the root to your_project/public, configure PHP handling with fastcgi_pass, add security headers, then enable the site and reload NGINX. - Q4: How can I secure my Laravel application on NGINX?
A: Use proper file permissions, deny access to hidden files, configure headers like X-Frame-Options and X-XSS-Protection, and restrict access to sensitive directories. - Q5: How do I verify that the Laravel application is running correctly?
A: Open the Laravel project in a browser. Ensure routes, database queries, and views are working as expected. Use php artisan commands to check framework components and logs for debugging. - Q6: Can this setup be used for production?
A: Yes, with proper server hardening, caching, SSL setup, and performance optimization, this guide provides a solid foundation for deploying Laravel applications in production environments.


