Installing Seafile Cloud Storage
The article will talk about the "cloud", which was created using the software solution Seafile. The product allows synchronizing information between different operating systems: Windows, Linux/Unix, Android and iOS. Consider how to install and configure disk storage for administrator requirements.
Requirements
To install Seafile, you must have preinstalled MySQL. On how to do this, there is a separate publication on our website.
Ubuntu Server 16.04 is used as the server platform (Seafile Server).
Installation
Check for the latest software versions.
sudo apt-get update

sudo apt-get upgrade
Install components for working with python.
sudo apt-get install python-imaging python-mysqldb python-setuptoolsUsing the download manager, download the latest release of Seafile from the official website.
wget https://download.seadrive.org/seafile-server_7.0.4_x86-64.tar.gzImportant! At the time of writing (August 22, 2019), the current version of the server part is 7.0.4.
So, let's extract the archive's contents. Let's go to the directory.
tar xzvf seafile-server*

cd seafile-server_7.0.4_x86-64
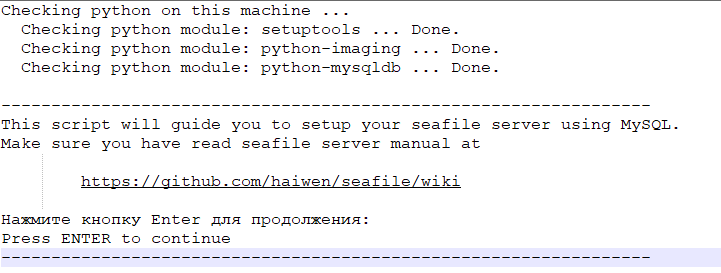
Inside we find the template, run it. It will check the necessary components.
./setup-seafile-mysql.shIf everything is present, then the following message will appear on the monitor:

Screenshot No. 1. Successful validation.
Following the prompts on the screen, press Enter and proceed to configuration.
Seafile Setup
We come up with an arbitrary name for the server-side. The name must not contain more than 15 characters:

Screenshot No. 2. We register the server name.
The next step is to specify the IP address or name. In our example, we use the first option:

Screenshot No. 3. Enter the IP address.
Choose the home directory for the storage:

Screenshot No. 4. Folder Selection
By default, it is proposed to create the Seafile-data directory under the root account.
Next, the setup wizard will ask about the port:

Screenshot No. 5. Port.
The factory setting is port 8082. If you do not need to change, then leave it as is and move on to the next step.
At the fifth step, the wizard will be asked to come up with a name for the database that will be used for work, or indicate a path to existing ones:

Screenshot No. 6. DB selection.
Since the story is about the initial installation and configuration, then select the first item.
The following two items are the MySQL server name and port number:

Screenshot No. 7. The name of the host.
![]()
Screenshot No. 8. Port Number
If changes are not required, then skip and move on.
Set the password for the MySQL administrator account name:

Screenshot No. 9. We come up with a password.
The following rules are recommended: a minimum of 9 characters, special characters, numbers, and capital letters.
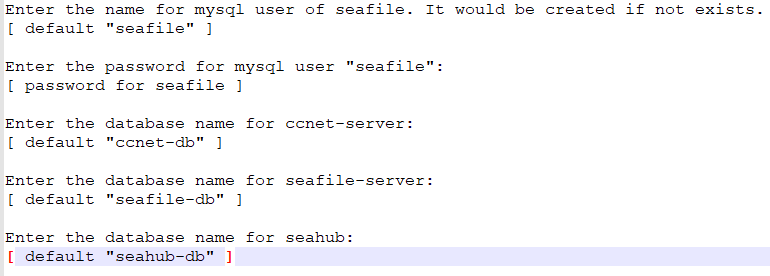
By default, the installation wizard creates users who will work with the file storage:

Screenshot No. 10. Users of the database and "cloud".
If desired, the administrator changes the values to their own.
At the last stage, the configuration utility displays the final configuration on the screen:

Screenshot No. 11. Settings Results.
If the values are correct, then press Enter.
The initial launch of Seafile
1. Run the service with the template created in the previous section. Add the connection through the browser to carry out further configuration.
./seafile.sh start

./seahub.sh start
2. During the first launch, you need to specify an account name for the system administrator and an email account:

Screenshot No. 12. Setting for the account.
For example, let's take the name admin, and specify the e-mail address on the serverspace.by domain.
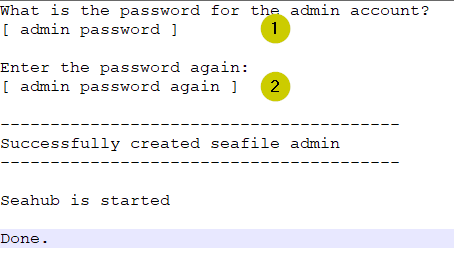
3. The next step is to enter the password for the administrator:

Screenshot No. 13. Password protection.
The system will ask you to specify the key twice to avoid an error. If indicated correctly, the service will start with the specified parameters.
4. The last step is to write exceptions in the firewall.
iptables -A INPUT -p tcp --dport 8000 -j ACCEPT

iptables-save
By default, the web interface runs on port 8000.
Browser Connection
We open the browser and prescribe the IP address that is specified above during setup. In the example, 111.111.111.111. Be sure to write the port number through a colon:

Screenshot No. 14. Server name.
If the address is correct, an authorization window will open. We use the electronic mailbox and password for the administrator to enter. In our example, the e-mail is admin@serverspace.by.
The file storage control panel opens.
Create New User
Go to the "Users" tab, click on the "Add ..." button.
In the window that opens, enter the email account and come up with a password. If necessary, indicate the person’s name and department.
Click "OK". A newly created user appears in the workspace.
 700
300
 700
300
 700
300


