In some scenarios, such as web hosting or application servers, it may be necessary to configure multiple IP addresses on a single network adapter in Windows Server. While adding one or two IP addresses through the graphical interface is manageable, manual configuration becomes inefficient when dealing with multiple servers and network adapters. In such cases, PowerShell provides a reliable way to automate network configuration on Windows Server 2016 and 2019.
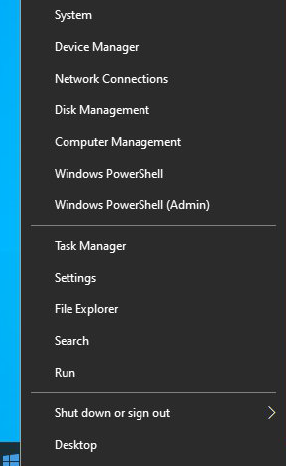
First you need to run Powershell as an administrator. You can do this by right-clicking on the "Start" menu and selecting "Windows PowerShell (Admin)" in case of an English version of OS:

Next, a PowerShell window will open. Now you need to determine on which interface you need to add the required IP addresses.
Using below command, we determine the required network interface:
Get-NetAdapter
In this case, one network adapter named "Ethernet", and we will use it. Let's first find out which IPs are already configured on this adapter using the command :
Get-netIpAddress -ifalias Ethernet -addressFamily Ipv4 | ft
To add a new address, for example 192.168.10.10, you must use the following command:
New-NetIPAddress -addressfamily Ipv4 -IPAddress 192.168.10.10 -PrefixLength 24 -InterfaceAlias “Ethernet” -SkipAsSource $TrueCheck the result by running this command below:

As you can see, the adapter has been assigned another IPv4 address — 192.168.10.10. If you want outgoing traffic to be sent from the added IP address, you need to change parameter as below :

If you need to add a larger number of addresses, for example 5, then you can use the script. Using an array of numbers, for example, from 11 to 16 and a foreach-object loop, add 5 more IP addresses:
11..16 | foreach-object {New-NetIpAddress -ifalias Ethernet -AddressFamily IPv4 -PrefixLength 24 -IPAddress "192.168.10.$_" -verbose}
After executing the command, check with the already familiar command:

In this article, we demonstrated how to use PowerShell to automate the configuration of multiple IP addresses on a single network interface in Windows Server 2016 and 2019. This approach significantly reduces manual effort and helps standardize network configuration across multiple servers.


